How to Use jQWidgets in Joomla
Joomla is a free open-source content management system (CMS) for publishing web content and building websites and online applications. In this tutorial you will learn how to use jQWidgets in the articles on your Joomla website. In Joomla, an article is a piece of content and is equivalent to a web page. You can learn more in the Article entry in the Joomla Documentation.
Before proceeding with this tutorial, make sure you have Joomla installed.
1. Include All Necessary Files
The first step to adding jQWidgets support to your Joomla website is to include
all the necessary files to the website. All files should be stored in the the folder
myjoomla\media\system, where myjoomla is the name of your
website.
Put the JavaScript files in system\js and the CSS files in system\css.
Here is a list of the files needed for our simple jQWidgets page, which will feature
jqxCalendar and jqxButton:
JavaScript:
jqxcore.js;jqxdatetimeinput.js;jqxcalendar.js;jqxtooltip.js;jqxbuttons.js;globalize.js.
CSS:
jqx.base.css;jqx.orange.css;imagesfolder, with images needed for the themes.
2. Load the jQWidgets Files in Your Articles
To successfully load the jQWidgets files in your articles, you would have to modify
the file view.html.php, which can be found in the folder myjoomla\components\com_content\views\article.
Open the file for editing and add the following code to the end of the display function:
$document = JFactory::getDocument();// adds jQWidgets JavaScript files$document->addScript('/myjoomla/media/system/js/jqxcore.js');$document->addScript('/myjoomla/media/system/js/jqxdatetimeinput.js');$document->addScript('/myjoomla/media/system/js/jqxcalendar.js');$document->addScript('/myjoomla/media/system/js/jqxtooltip.js');$document->addScript('/myjoomla/media/system/js/jqxbuttons.js');$document->addScript('/myjoomla/media/system/js/globalize.js');// adds jQWidgets CSS files$document->addStyleSheet('/myjoomla/media/system/css/jqx.base.css');$document->addStyleSheet('/myjoomla/media/system/css/jqx.orange.css');
The addScript method loads a JavaScript file in your page and addStyleSheet
loads a CSS file. The jQWidgets files we added in the myjoomla\media\system
folder will now be loaded in your articles.
3. Allow script Tags in Your Articles
Before creating a page, which features jQWidgets, you will have to enable the use
of script tags in the content of articles, which is disabled by default.
Go to your website's administrator page. From the top menu select
Extensions → Plugin Manager. From the plugin list
in the Plugin Manager: Plugins page that opens select Editor
- TinyMCE. Remove scripts from the list of Prohibited
Elements and save the changes:

4. Create a New Article and Add jQWidgets to It
From the top menu select Content → Article Manager → Add New Article. You will see the following screen:
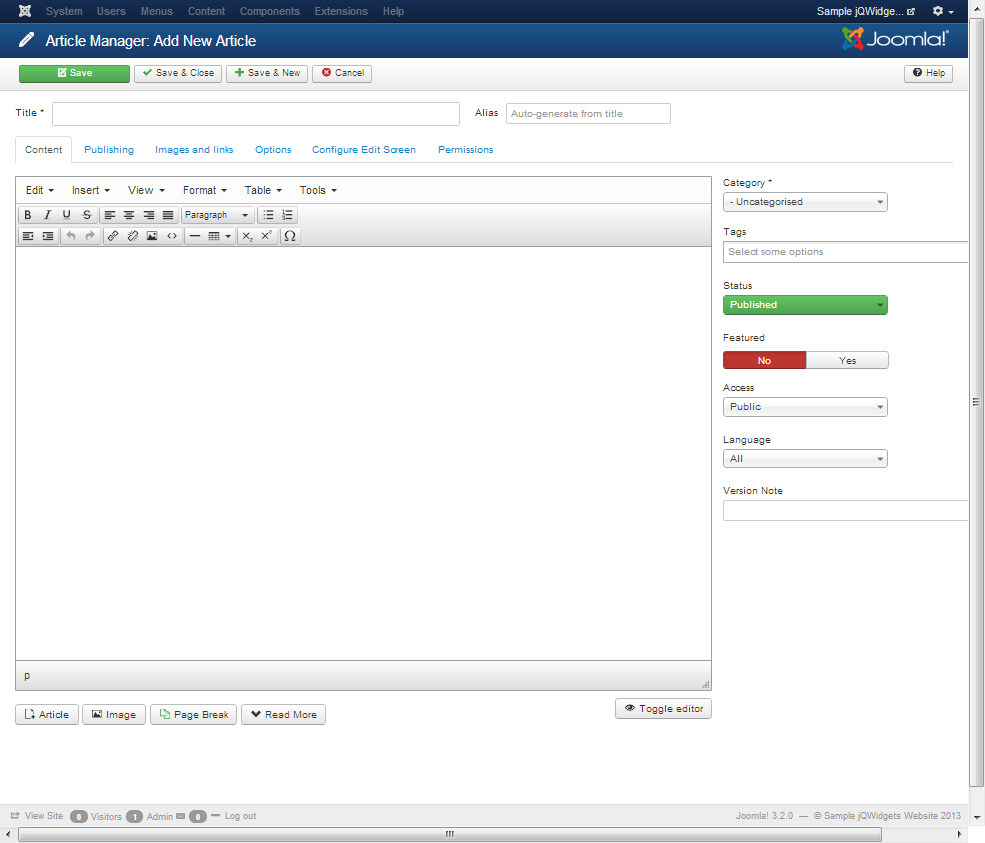
Press Toggle editor to switch from WYSIWYG editor to code editor. Add the following code to the article:
<script type="text/javascript">jQuery(document).ready(function ($) {$("#widgetsContainer").html('<div id="jqxCalendar"></div><br /><div id="jqxButton">Change the date</div>');$("#jqxCalendar").jqxCalendar({ theme: "orange", width: 220, height: 220 });$("#jqxButton").jqxButton({ theme: "orange", width: 150 });$("#jqxButton").click(function () {$('#jqxCalendar ').jqxCalendar('setDate', new Date(2013, 11, 31));});});</script><div id="widgetsContainer"></div>
Then click Save.
The code appends the needed HTML elements for the jqxCalendar and jqxButton to the div with id widgetsContainer, initializes the widgets and adds their functionality. This is the safest way to add the needed HTML, due to the specificities of Joomla.

5. Add the Article to the Main Menu and View It
From the top menu select Menus → Main Menu → Add New Menu Item. You can add a new main menu item in the newly opened page. At Menu Item Type select Articles → Single Article. At Select Article choose Sample jQWidgets Article:
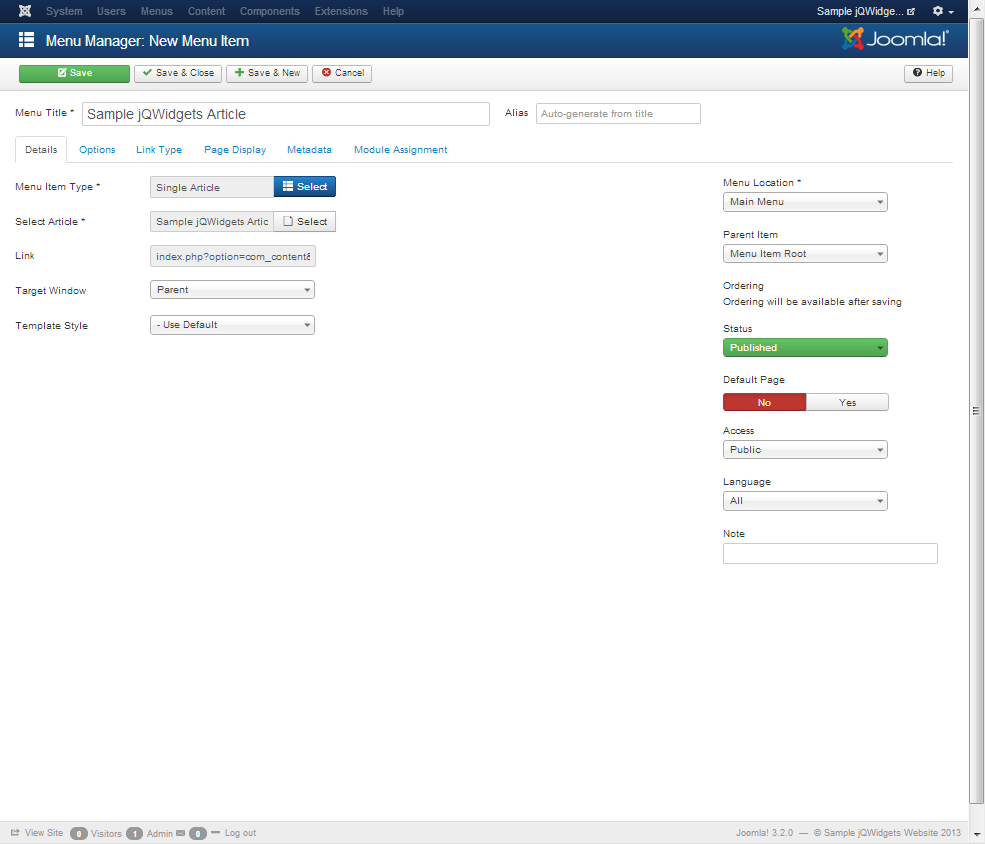
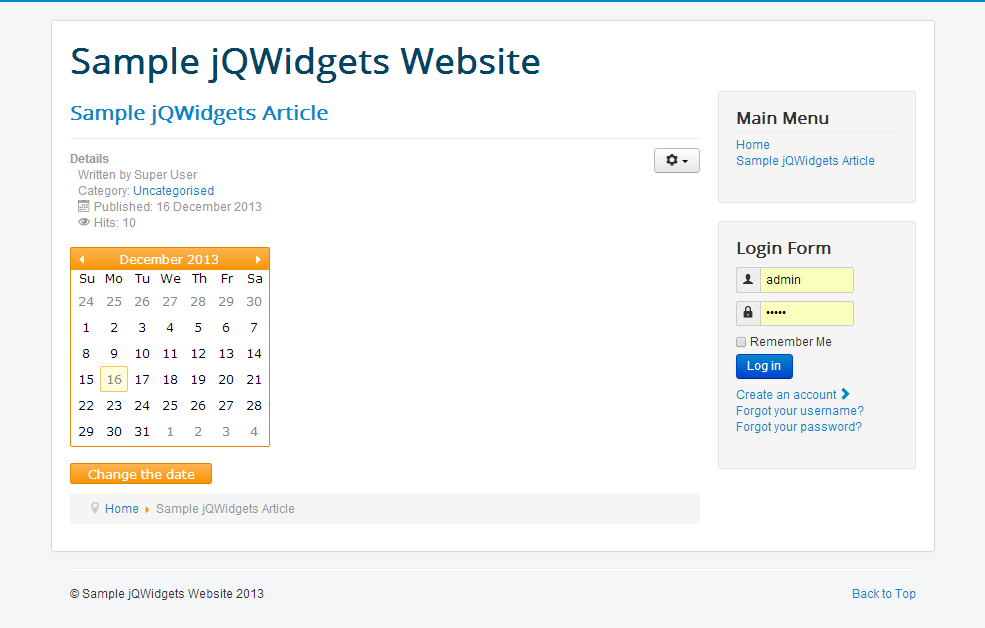
Save the new menu item. Go to your website and view the new article, featuring jQWidgets: